পণ্য


.svg)

.svg)

এই নিবন্ধক ইমেল ফরওয়ার্ডিং পরিষেবা সরবরাহ করে না।
আমাদের প্ল্যাটফর্ম ব্যবহার করে আপনার নিজের ডোমেনে আপনার স্টোর সেট আপ শুরু করতে, আমাদের ওয়েবসাইটটি দেখুন, www.gearlaunch.com/platform এবং "আজ আমাদের সাথে যোগ দিন" এ ক্লিক করুন।

"লগইন" বোতামে ক্লিক করুন। লগ ইন করতে আপনার জিমেইল ঠিকানা এবং পাসওয়ার্ড ব্যবহার করুন।

গিয়ার লঞ্চ বিক্রেতা নিবন্ধকরণ ফর্মটি পূরণ করুন এবং তারপরে "জমা দিন" ক্লিক করুন।

গিয়ারলঞ্চ বিক্রেতার চুক্তিটি স্বীকার করুন।
পৃষ্ঠার নীচে স্ক্রোল করুন; আপনার ডোমেন রেজিস্ট্রার এবং আপনার ডোমেন যুক্ত করুন তারপরে "জমা দিন" বোতামটি ক্লিক করুন।

আপনার দোকানের অনুমোদন পেতে সাধারণত 24 ঘন্টারও কম সময় লাগে। এটি অনুমোদিত হলে আপনাকে ইমেলের মাধ্যমে অবহিত করা হবে।

আপনার স্টোর অনুমোদিত হওয়ার পরে, আপনি আপনার গিয়ারলঞ্চ অ্যাকাউন্টে লগ ইন করতে পারেন। আপনার ড্যাশবোর্ডে, সবুজ বারে ক্লিক করুন যা বলে, "এই গিয়ারলঞ্চ সাইটটি এখনও চালু হয়নি! আপনার ডিএনএস সেটিংস পৃষ্ঠাটি দেখতে এখানে ক্লিক করুন।

এরপরে, "ডিএনএস রেকর্ডগুলি পরীক্ষা করুন" বোতামে ক্লিক করুন।

এই ডিএনএস রেকর্ড এবং মানগুলির সাথে আপনার ডোমেন রেজিস্ট্রার আপডেট করতে এখান থেকে মানগুলি অনুলিপি করুন।

আপনার ডোমেন রেজিস্ট্রার ওয়েবসাইটে যান এবং আপনার অ্যাকাউন্টে লগ ইন করুন।
আপনার GearLaunch ড্যাশবোর্ড থেকে পাওয়া তথ্য দিয়ে আপনার DNS রেকর্ডগুলি আপডেট করুন।
Once you’re set up with your GearLaunch account, log into your Godaddy.com account. Go to your profile on the top right corner and click on “My Products” from the drop-down menu.

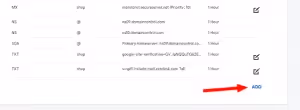
Scroll down to the “Domains” section, look for the domain you want to set up and click on the DNS button.

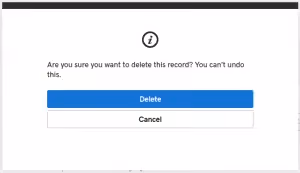
Get rid of all existing DNS records that can be deleted.

Confirm the deletion in the pop-up window by clicking the “Delete” button. That’s the easiest way to make sure you correctly set up your DNS records without any other records interfering.
Next, set up your own DNS records by clicking the “ADD” link.
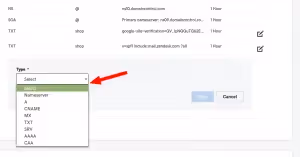
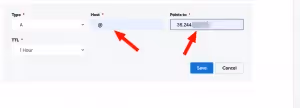
Click on the “Select” drop-down list to add the corresponding records. Then fill the fields with the records provided in the GearLaunch admin setup page and click on “Save”.
Once you’ve configured all your DNS records in your GoDaddy.com account, you’ll need to upgrade to use Office365 to set up your email forwarding. Doing so allows your customers to reach our customer service team directly.
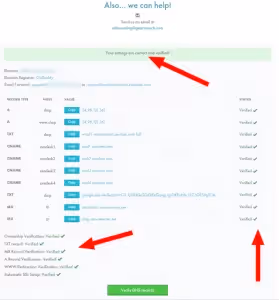
The last step in your Godaddy.com account is waiting for the registrar to populate the DNS records update. Once you click on “Verify DNS records” and each setting’s status is “verified”, it means your store is live.
Once the email forwarding is set up and confirmed, your store will begin the SSL certificate signing process, which could take up to 24 hours to be completed. It’s worth the wait for your store to be live and secure.
ভিডিও নির্দেশনা:


.svg)
.svg)
.svg)


